Cesto
Limpar cestoTotal:
With the introduction of digital currencies, new tools and techniques came into existence to power the growth of cryptocurrencies. Several crypto wallets and exchanges entered the crypto market to ease investors in handling their crypto operations and funds. Some of them become popular while others failed to gain people’s trust and have an average number of users.
One such well-recognized wallet in the crypto market is MetaMask. The wallet is designed in a manner that is equally easy for those who prefer to work on mobile devices and computers/laptops. To ensure that none of their users face difficulty in using the wallet, it is kept simple with easy navigation. In addition to it, the wallet is available in the form of a mobile app and extension.
Well, you might be well aware of its mobile app but today, we will be discussing the MetaMask extension. If you too want to know about the wallet’s extension then be a companion in this read.
Talking about MetaMask is one of the most reliable and well-recognized crypto wallets. The wallet is distinct from the other crypto wallets on the grounds that it majorly works for the Ethereum and ETH-supported tokens, unlike the other crypto assets. Calling spade a spade, the wallet bridges the gap between the Ethereum interface and the user. One of the functions of the wallet apart from storing and managing the crypto funds is to inject web3 (a javascript library) in the namespace of each of your browsers.
This is just a briefing of the wallet. You might be now thinking of what the MetaMask extension is. Unlike a mobile app, an extension acts as an intermediary that connects the wallet and users operating through a computer/laptop. If you are a person who prefers to work through a web plugin, then you’ll need to get a supported extension first. To date, there are five supported browser extensions available for this wallet, and they are as follows:
Among all the above-listed ones, Chrome is the most popular and reliable extension for MetaMask. So, in this read, we will be covering the steps to install and use Chrome as a MetaMask extension. Let’s begin by understanding the complete process of installing the extension.
The utmost steps here in using this crypto wallet is to first install a compatible browser that serves as a backbone in functioning the crypto activities. Here, we are picking Chrome for installation to perform the crypto operation. The steps to install it are as follows:
Great!! The extension will then be installed on your device successfully and the same will be visible next to the search bar of your browser.
I am thinking of what’s next now.
Sit tight. We are here to guide you through the complete journey. Once the extension is installed successfully, the next step is to get started availing of its services. Check out the next section of the reader to know how to commence using it.
Follow the above-covered steps to get a MetaMask extension installed on your device successfully. The secret phrase holds the complete functioning of the wallet, so it is advisable to store it somewhere safe. If you ever get stuck in restoring the wallet, this phrase will help you.
Cash App has always given us several reasons to use it and one such common reason why people like this app is because it is not only limited to sending and receiving money. Hence, in today's blog post, we shall be having a closer look at the process to make a visible increase in our funds. Now, you might be wondering how that is even possible. Well, Cash App allows you to make investments in stocks of different companies along with Bitcoin trading. And, all of this is available right after you do your Cash App login .
So, if you are a new Cash App user and you wish to put your money to work, then you can surely take a look at the topics that I am going to include in today's read. So stay tuned to learn more about it.
As you know that people usually invest the surplus money that they have so that they can extract more benefits out of their money. So, if you are planning to use your surplus money to make an investment in any of the popular stocks, then you can easily do so with the help of the Cash App platform. This allows you to make sure that you receive good returns when the stock market goes up. And the same is the case with crypto assets.
Here we are with the steps that you can take for buying stocks through Cash App:
If you have enough funds in your Cash App account, the purchase order would be processed immediately. In case you do not have sufficient balance, the amount shall be debited from the card that you have linked with your Cash App account.
As soon as you complete the process, you can track or view the status of your investment by choosing the "Investing" tab available on your Cash App home screen and then navigating to the "My Portfolio" tab.
I hope you understood this process and now we shall have a look at the process to purchase Bitcoin through Cash App. Have a look.
As you know that crypto investing is one of the biggest alternatives to stock investment and people are extracting a lot of benefits from it. So, in this process, we shall be guiding you on how you can invest in crypto through Cash App. Since the only crypto available for trading on Cash App is Bitcoin, therefore, we will be taking a look at the same.
Here's what you got to do:
I hope now you got an idea of how you can trade crypto assets or invest in stocks through your Cash App account.
As you can clearly witness, one-time Cash App login opens several gateways for you to make great financial moves and strategies. If you are a beginner with this platform, then you might be interested to know that you can actually put your money to work by investing it through Cash App. And, we have already explained to you the method to do so.
The software does come with regular updates. Updates can be referred to as a way of bringing out new techniques and adding them to the existing version to provide users with better functionalities. As the crypto trade is also wholly dependent on digital platforms thus, the tools to carry out the trade such as crypto wallets, and extensions are also available in the form of software.
Thus, to ensure that you don’t face any trouble because of an outdated version of any software, we are here to assist you how to update your MetaMask extension manually. We all know that MetaMask is a crypto wallet used to manage and store the valuable funds generated out of the crypto trade and extensions are the bridge that lets the investors access their wallet on the web.
But what if you are using an outdated version of the extension?
Will it help you to streamline all your crypto activities easily?
Obviously “NO”. So, to throw out this trouble from your path we have prepared this read. Go through the provided information to learn how to tackle this issue conveniently.
Extensions are the link that connects the investors with their respective wallets via the web. The process of accessing the wallet doesn't end with getting a compatible extension installed on your device, rather it does need regular updation if and when a new version is launched.
The read was prepared with the aim of providing you with complete information on how to update your wallet extension without involving any intermediary in the complete process. In this section of the read, we will discuss the updation steps of one of the widely installed Chrome extensions of the wallet.
The steps to get the Chrome extension updated manually are:
All done!! This will get your MetaMask extension updated to the latest version. The steps involved in updating the extension are straightforward and can be easily completed within a few minutes.
MetaMask wallet extension plays a vital role in the complete trade and investment mechanism. An outdated version of the supported extension will let you lose the crypto opportunities, which as a result abstain you from uplifting your trade journey to new heights. Thus, it is advised to regularly update your wallet extension, so that you can perform well in the crypto trade and make handsome profits from them.
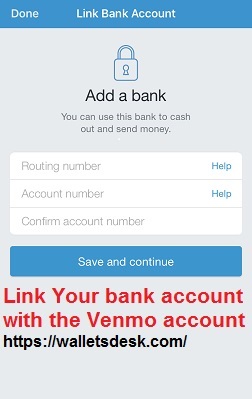
After you have successfully set up your new Venmo account, you should link your bank account with it in order to start making any transactions. Whether you wish to send money through Venmo or receive from other Venmo users, it is pretty important that you set up your bank account with it. Although this option is available to the users while they are setting up their account, however, they can skip this step and add their accounts later on. To initiate the process, you just need to have your Venmo login details ready and follow the steps given below.
After adding your bank account and verifying your identity with Venmo, you will see an increase in the Venmo Transfer limit and you can also make your Venmo journey a smoother one. So, with no further delay, let us jump to knowing the method to add a payment method to Venmo.
To link your bank account with Venmo manually, you just need to know your Venmo Sign in credentials and then start the process given right here:
Furthermore, you need to know that, if you have chosen the bank account option then you do not need to enter the check number that appears at the end of your account number.
When you add a payment method to your Venmo login account, this helps increase your Venmo transfer limit and make account transactions from your account smoother. In case you face any error while adding your bank account, make sure that you have provided the correct details on the bank linking form. for more information about venmo and his related questions like how to unfreeze venmo account, transfer money from venmo to paypal, Venmo transaction declined , Difference b/w venmo vs zelle vs paypal , activate venmo card etc come to my website wallet desk and read my venmo section ,where i have discuss all above mentions topics.
Venmo is globally renowned as one of the best payment applications there ever has been. It is a peer-to-peer online payment application that was designed with an advanced text messaging platform that successfully generated a vast social network. Unlike other banking mobile applications, with a Venmo login account, you get a perfectly crafted gateway to move around your money and interact with users on the Venmo network. Here, in this detailed read, you’ll discover a helping guide to create your account on the platform and the steps that you have to undergo to move your funds around via the Venmo login account.
Venmo mobile application is carefully designed with precise algorithms and to help you have the best user experience that you can yield from any such payment application. Thus, given below are the steps to create your Venmo login account for an exclusive online payment utility:
Note: You have the authority to decide whether you want to add your bank account, but if not, you can still use your Venmo login account to make payments. Also, with the account are become eligible to acquire and activate Venmo card that can be used to pay in places that accepts payment from Mastercard.
Listed below are the steps that you should follow to make successful payments via your Venmo login account:
The above read has been focused on one of the best peer-to-peer payment applications- Venmo. One reason that helped Venmo come under the spotlight was its advanced text messaging platform which over the years caught a lot of eyes and successfully, created an active social network for all its users. This careful elaboration of the steps involved in creating a Venmo login account and steps to send out payments through the mobile application will help you with a great Venmo experience. for more information about venmo come to my website wallet desk and go to venmo section. where i have try to discuss all venmo topics like How to sign up or login for Venmo? , how to unfreeze venmo account? , transfer money from venmo to paypal , Venmo transaction declined, venmo vs zelle vs paypal , How to delete a Venmo account? etc many blogs.
_thumb.jpg)
_big.jpg)